Powered By Blogger

Monday, 12 May 2014

Caramel Slice


It's no secret I'm a sweets kinda gal, so when I got a request for a caramel slice, I jumped at the chance.
With Mother's Day on my mind, I set out to make a sweet little treat my mami would love and one that I would also be happy eating. 

Whilst these are a healthier version than your average caramel slice, they should still be seen as a treat and enjoyed as such.
I find them really rich, so I suggest cutting them up into small squares and keeping them in the freezer, ready to be eaten whenever the urge attacks!

And don't fear, they are gluten free, refined sugar free and raw vegan.  Hooray!

Caramel Slice
Makes 12 3x3cm squares

Ingredients

Base
1/2 cup raw almonds
1/2 cup activated buckinis
1/2 cup dessicated coconut
10 pitted medjool dates
1 tsp of vanilla extract
2 TBS of coconut oil

Caramel
1/2 cup tahini
1/2 cup coconut nectar (or rice bran syrup/maple syrup)
1/4 cup coconut oil
1 tsp of vanilla extract
pinch of Himalayan pink salt
1 TBS of raw mesquite powder*

Chocolate
1/3 cup coconut oil
4 TBS raw cacao powder
4 TBS coconut nectar (or rica bran syrup/maple syrup)
1 TBS of coconut cream

Method

Base
Place all ingredients in the food processor and pulse until everything resembles fine crumbs and sticks together.  Add more dates if needed.
Press mixture into the bottom of a square cake tin that you have lined with baking paper.
Press down on mixture, spreading it evenly.  I use the bottom of a glass to smooth it out.
Place in freezer whilst you make the rest of the components.

Caramel
Place all ingredients in a blender and blend it until it's all super smooth and delicious.
Pour this over your prepared base, and smooth it out with a spatula so that you get even cover.  Place in the freezer whilst you make the chocolate.

*Mesquite powder is a high protein meal that contains good quantities of calcium, magnesium, potassium, iron and zinc, and is rich in the amino acid lysine as well. Its low GI of 25 helps maintain stable blood sugar levels.
It has a lovely flavour that tastes a bit like caramel which is why I used it here.

Chocolate
Mix all of the ingredients together really well, making sure there are no bubbles.  The coconut oil needs to be liquid for this so if it's hard, just place the coconut oil jar in some boiling water to melt before you add it to the rest of the ingredients.
Once it's all mixed, you need to work quickly as it will start to harden, making it difficult to get an even spread.
Pour the chocolate over the caramel and spread evenly with a spatula.
Place in the freezer to set for about 30 mins or better yet, a couple of hours.
When ready, use a hot knife to slice it into pieces for you to enjoy.


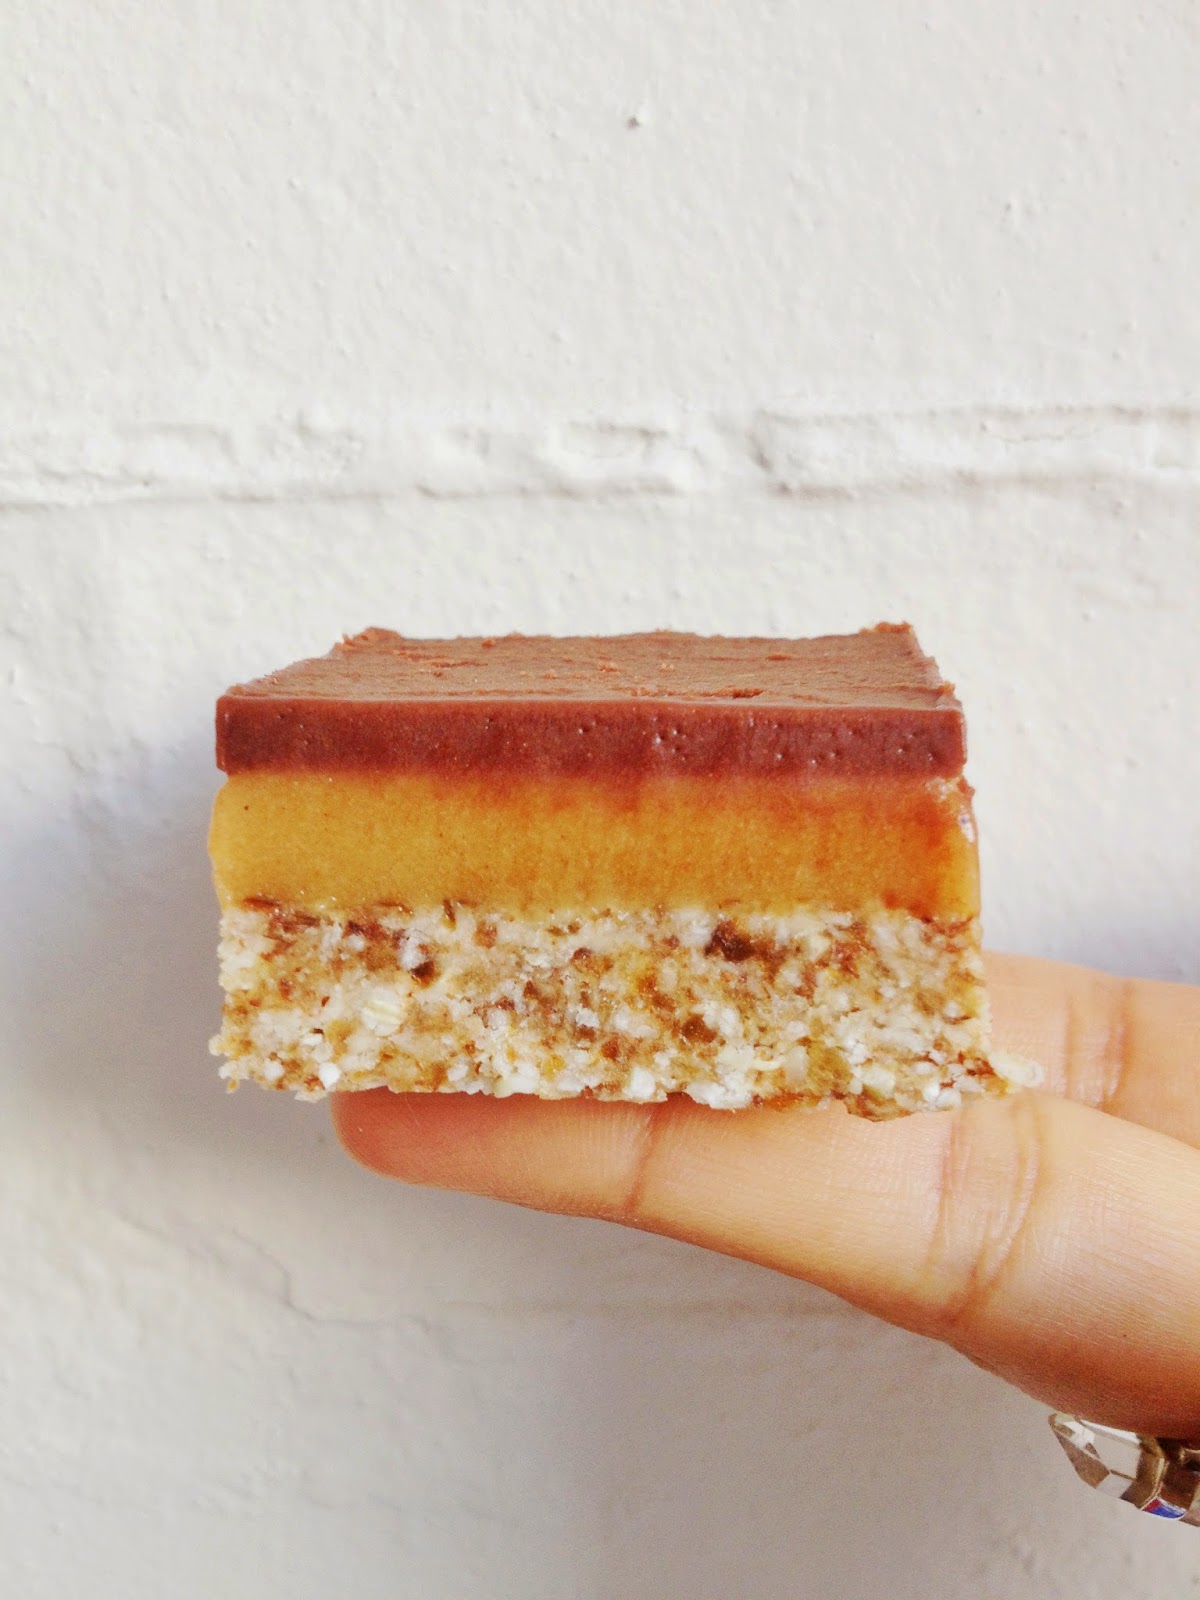
Now was that one of the easiest things you ever made or what?!  
Hope you enjoy it as much as I did.

Peas, love and mungbeans

xxb

Friday, 2 May 2014

Baking wunderkind


From the first time that I stumbled across Zainab and her creations, I was instantly in foodie love.  Apart from her photography skills, this girl can bake!  
Her creations are as delicious as they are beautiful and they inspire me to get my oven mitts out and get to it!

But baked treats aside, I was also intrigued. 
Who is the girl who makes all these elaborate and delightful goodies?
There's was only one way to find out and that was to ask her.
In today's blog post, I interview Zainab, the brains behind the recipes, the eye behind the lens, a true baking wonderkind!

Can you tell us a bit about yourself?

I'm a 16 year old vegan girl from Sydney, Australia who's in love with baking and photography. I started baking when I was 7-ish and discovered photography soon after I started my food blog (la gallette). I come from a Persian-Iraqi background I can can speak both Persian and Arabic (but not fluently)! I'm your total nerd! Maths is my drug of choice and I'm obsessed with it (weird I know!). I'm quite a shy person but once you get to know me, I'm all sorts of crazy!

What is your eating philosophy?

I believe in eating enjoyable healthy, nutritious foods, feeding your body what it needs but still maintaining a balance. Finding the balance is the key.

When and why did you decide to start eating this way? 

It's actually quite a long story, but I'll try to fast forward it up a bit...

I was never the healthy type. I was overweight when I was about 10 and I decided to go on a diet, the only thing is that I had no idea what I was doing. It was bad, I would eat half an apple a day for a period of 3 months. I was deteriorating, I became nauseous and tired. My body was giving up on me but I lost a total of 25kg. I went from overweight to underweight. I had a hard time with food, I viewed it as the enemy and shortly after I developed a bad relationship with food. I became bulimic and had body-image issues.  Eventually, I recovered and discovered the real meaning of health and healthy eating.

Have you noticed any difference since changing your eating philosophy (if any)?

I've become happier and healthier. Ever since I've opted for a vegan diet, I've noticed a jump in my step!

Have you met any barriers to eating this way, if so, how did you overcome them?

There aren't many barriers but the thing that slowed me down was definitely what others think. Being a vegan, of course caused some negative attention from friends and family but I overcame that.

What is your favourite dish to make?

Ooh, that's hard! But I'm going to have to go with a classic chocolate cake. I can't help myself when it comes to these babes!

What ingredients are a must-have for your fridge/pantry?

I have to have the vegan-baking essentials, like: 
Dates, coconut oil, brown sugar, oats, quinoa, almonds, green tea, bananas, chia seeds, natural peanut butter and a whole lot of fresh fruit and vegetables!

Juices or smoothies? What do you prefer and what combination?

Smoothies, for sure! Banana, pineapple, coconut with a bit of lime zest is my all time favourite. 

Sweet or savoury?

SWEET! Gimme all the sweet stuff in the world!

Can you share a fave recipe with us?

I have way too much favourite recipes, but I’m currently loving these triple coconut drizzle slices, they're really easy to make as well:

Ingredients

Coconut cake:
5 tbsp coconut oil, melted 
1/3 cup coconut palm sugar (or any other natural sugar)
400ml coconut milk
1 cup white spelt flour
1/2 tsp baking powder
1/2 tsp baking soda
1 cup desiccated coconut
2 tsp vanilla extract

Drizzle:
1 tbsp almond milk
1/2 cup icing sugar
chopped hazelnuts, pistachios and almond

Method

Preheat the oven to 180C. Line a square baking tin with grease proof paper.
In a large bowl, whisk together all the ingredients until combined and pour into the prepared tin, smoothing the batter all the way out to the sides. Bake for 30 minutes or until lightly golden. Cook before icing and sprinkling with chopped nuts of your choice.


If you could give someone new to this lifestyle a piece of advice, what would it be?

Treat your body with love, don't neglect it, feed it with nutritious fuel and most of all, don't give up! You deserve the best.


So there you have it, the gorgeous girl behind the lens and the oven mitts!
Please head over to Zainab's blog, La Gallette, apart from being a feast for the eyes, there's also a ton of delicious recipes that'll keep you busy.  
You can also find Zainab on Instagram: @lagalette 

Thanks Zainab for being so lovely in sharing your time and your recipes, you are a beautiful soul & I can't wait to try more of your yummies!

Peas, love and mungbeans

xxb

*All images provided by Zainab Alasadi and used with her permission

Friday, 25 April 2014

Anzac Biscuits with Homemade Nutella


My husband loves biscuits, and Anzac biscuits are one of his fave all time biscuit.  So I set out to make some vegan friendly Anzac cookies that still tasted good, with the right amount of crunch.
For those of you who are wondering what Anzac is, it's actually a public holiday for us Aussies, to commemorate and remember those who have died in military operations.
The Anzac biscuit was originally called 'soldier's biscuit' and it came about from family who were wanting to send their loved ones supplies that would last without refrigeration, withstand the travel and also pack a nutrient punch.  Enter the Anzac biscuit.

Here's an old recipe that I found and which I've adjusted to make it vegan.

Anzac Biscuits
Makes 16

Ingredients

2 cups of organic wholegrain oats
1 cup of organic spelt flour
2/3 cup organic panela (you could also use caster sugar)
3/4 cup desiccated coconut
1/3 cup golden syrup
125 g of organic coconut oil
1 tsp bicarb soda
2 TBS hot water

Method

Pre-heat oven to 160 degrees Celcius.  
Place the oats, flour, sugar and coconut in a bowl and mix well to combine.  Place the golden syrup and coconut oil in a small saucepan over low heat until melted.  
Combine the bicarb and water together and add to the coconut and golden syrup mixture.  It will bubble, just keep stirring it and then pour it over your oat and flour mixture and mix well to combine.
The mixture will be crumbly and won't stick together completely, don't fret, this is fine!
Place one tablespoon of the mixture onto lined baking trays and flatten to make rounds.  Make sure you leave some room between biscuits for spreading.  
Place in the oven and bake for 10 minutes.  Take them out and leave to completely cool before you lift them off otherwise they will fall apart.
Be patient, the crunchy biscuit that you end up with will be worth it!

Now you can eat them as is, crumbled over ice cream, or stuffed with some delicious homemade nutella!


Homemade Nutella
Makes approx. 370 mls

Ingredients

150 g of raw hazelnuts
2 tsp pure vanilla extract
3 TBS raw cacao powder
4 TBS raw coconut nectar (or maple syrup)
1/8 tsp of Himalayan pink salt
1 TBS EV coconut oil
1/2 cup almond milk*

Method

Place the nuts in a food processor and process until they begin to form a paste.  This will take a while, and you will need to scrape down the sides intermittently.  I found that I had to stop and start as the motor was heating up!
Once it's start to form a paste and you can see that the oils are starting to get released, add the coconut oil and continue processing until it starts getting smooth.  Add the rest of the ingredients and process a little bit more, until it's all creamy and spreadable.  You can stop here or do what I did which is added it all to my vitamix and blended it on high for about 30 seconds.
This gives it a really smooth and creamy texture, more than what I got when I did it with just the food processor alone.
Place in the fridge for about 30 minutes before you start spreading.
The colour of the nutella will darken if left exposed to the light/air.
I keep mine in a glass container with a tight fitting lid.

*I used store bought almond milk because it has a milder flavour than homemade as I didn't want the delicate hazelnut flavour to be over powered but choice is yours.

Hope you enjoy the recipe and please let me know if you try it.

Peas, love and mungbeans

xxb

Thursday, 3 April 2014

waste not


So as promised, here is a recipe for almond milk.  It's so ridiculously easy that I'm looking forward to making lots of other nut milks.
My first advice is to buy a nut milk bag, they are not very expensive and you should get a lot of use out of it.  I have tried using a clean dish towel before but it does let a lot of the pulp in, making your nut milk thicker, and that's ok if that's what you like.
The following recipe is for basic unsweetened almond milk.

Almond milk
makes 2 cups

Ingredients
1 cup raw almonds
2 cups of water

Method 
Soak the raw almonds in lots of water for 48 hours.
Once soaked, rinse well and drain.
Place almonds in a powerful blender with 2 cups of clean water (use filtered if possible).
Blend until mixture is super smooth.
Pour mixture into nut milk bag, making sure you have a bowl to catch the nut milk!
Squeeze as much of the liquid out as you can.
Pour prepared milk into a glass bottle with tight fitting lid, it should keep in the fridge for 2 days.


Now at this point, prior to bottling, you can add your flavours.
So normally I would add some organic vanilla extract and a couple of drops of stevia or a date to give it a tiny bit of sweetness.

Was that the easiest thing ever or what?
You can do that to every nut you desire.

So, with delicious fresh almond milk in tow, I decided to make a yummy turmeric almond milk.

Why do I love turmeric so much?
Simple really, turmeric is an overall healing spice.  Apart from being a powerful anti-inflammatory, it also has anti-tumour and anti-microbial properties.  
It's the bright yellow pigment, curcumin, that makes turmeric the pharmacological powerhouse that it is.

Here's what you need:

Tumeric Almond Milk
Makes 2 cups

Ingredients
Prepared almond milk (as above)
2 pitted medjool dates
1 TBS raw coconut nectar
1 1/2 tsp of ground turmeric
1 tsp ground cinnamon
1/4 tsp ground ginger
1/8 tsp of cardamon
freshly cracked pepper*

Method
Blend all ingredients together until smooth.
*adding the black pepper means that piperin, the active ingredient in black pepper, increases turmeric absorption, making it up to 2000x more powerful.  Hand me the grinder!!


Whilst you can have the turmeric almond milk cold, it also makes a delicious and nourishing drink when warm.  
To keep it raw, I just blended mine again in the vitamix until it warmed up a bit.  

So I bet you're wondering about the almond pulp right?  No, don't throw it in the bin!  There's many things that you can do with almond pulp, here's one of my favourite ways with almond pulp.

Almond Hummus
Makes about 500 mls

Ingredients
Left over almond pulp
1 large zucchini
small handful of baby spinach
1 garlic clove
1 tsp of ground cumin
juice of half a lemon
1/4 cup of water
Himalayan pink salt and freshly ground pepper to taste

Method
Blend all ingredients together in a powerful blender, you will need to scrape the sides down to make sure you get a smooth consistency as it's quite thick.  Don't be tempted to add more water, you just need to push the ingredients down with the blender tool to get all the ingredients blended up.
Store in a glass container with a tight fitting lid.  Should keep for about 3 days.


The reason I love this hummus so much is because it still has that delicious smooth consistency and taste but is completely raw.  I've tried making raw hummus before using sprouted chickpeas, but it didn't taste as good as this!

I also use the hummus as a salad dressing, it's the bomb!

Peas, love and mungbeans,

xxb

Wednesday, 2 April 2014

in a nut shell......

In my last post, I shared some ice cream recipes that contained store bought almond milk.  After this post, one of my readers on instagram asked me regarding an ingredient used in almond milk called carrageenan.
I had briefly heard about this ingredient before but decided to look into it further after it came up again.
It seems that there has been a lot of concern by the health community regarding the use of carageenan, even as far as organising a petition so that the FDA remove it from the food supply.(ref)

This is what I now know about carageenan:
  • derived from red algae.
  • used as a thickener or stabilizer in dairy & non-dairy milks, cheeses, meat products.
  • 2 types: degraded and undergraded.
  • undergraded is approved for use in food, degraded is not
  • they have different chemical properties although both are often referred to as carageenan.
Let's talk about degraded carageenan or otherwise known as poligeenan.  This ingredient has been shown to cause formation of ulcers and cancerous lesions in the colon of animals.(ref)
Poligeenan is significantly more detrimental to the health of laboratory animals than carageenan but lack of clear differentiation between the two types means that most of us think that carageenan (undergraded) is as harmful.

Carageenan can still cause problems though, but unlike poligeenan which has been shown to cause cancer on it's own, carageenan has been shown to accelerate cancer formation only when in the presence of a known carcinogen.
I'm not saying that it's safe, I'm just making the distinction that unlike popular belief, on it's own, it's not a known carcinogen.

What it has shown to cause, is intestinal damage in some species of animals.  This of course means that the effects of carageenan are species specific thus makes it difficult to apply the various study findings to humans.

Two studies done on food grade carageenan found that it increased the inflammation response of isolated human intestinal epithelial tissue.(ref,ref)
Another study found that it reduced the activity of some enzymes which may have an overall negative effect on the function & vitality of the cell.(ref)
In concentrations lower than would be found in a typical diet, this study found that carageenan caused increased cell death, reduced cell proliferation and cell cycle arrest.(ref)

Whilst these studies lend support that carageenan has potential for intestinal inflammation, it's good to keep in mind that they were done in vitro (as in not inside the human body) and that the carageenan used was in the absence of food, which means that the results may vary as most of us would be getting the carageenan in our foods and that the digestion of same may alter how it affects us.
This brings me to another concern voiced by the health community, that ingested carageenan can turn into poligeenan in the digestive tract after it's been eaten, secondary to gut environment (bacteria, acidity).  Some studies have shown that 10-20% can be turned into poligeenan during digestion.(ref)
Also, whilst these studies show that it can affect human tissue, other studies show no adverse effects.

So are you confused?  I don't blame you.
It seems that no matter what, there's always a price to pay for convenience!
So what should we do?  

I guess this is up to you, I'm just highlighting some of the points that stood out for me, but I always encourage everyone to do their own research and make up their own mind, specially due to the inconclusive nature of the data, both for and against.
If you are going to avoid it, please check the label, sometimes it's also labeled as vegetable gum (407).


For me, apart from being a positive learning experience, it has also inspired me to make my own nut milk.
So I finally bought a nut milk bag (highly recommend) and my first batch was delicious!
So easy and the possibilities are endless.  I think I'll be making my own nut milk from now on!
Will have a post on some delicious nut milk very, very soon.


Peas, love and mungbeans

xxb

Thursday, 27 March 2014

Gimme Gimme!!!!

There's something about ice cream that makes everyone who comes into contact with it, love it.  Am I right?  
If there is a person that doesn't like ice cream, I'm yet to meet them.
And yes, plant based babes can enjoy their ice cream as well as non-plant based peeps, we just enjoy ours without a side of blocked arteries (no offence to my non-plantbased readers but this is just a fact of animal fats).
So, without getting all political on y'all, I'm going to give you a couple of recipes to get your ice cream on, or nice cream.  Whatever you prefer to call it, this frozen deliciousness will sure to keep your taste buds singing!
Sorry for the lack of photos, but I ate it all too quickly, yikes!


Vanilla Chai Ice cream
Makes about 750 mls

Ingredients
1 cup of unsweetened vanilla almond milk (I used Almond Breeze)
1/2 cup of soaked and rinsed cashews (soak for 30 min or overnight)
1/4 cup of coconut sugar
1/3 cup rice bran syrup
2 tsp of pumpkin spice mix
1/2 tsp of ground ginger
3 cups of chai tea*
1 1/4 cup boiling water
1/2 tsp xantham gum

Method
Place your tea bags into the boiling water and leave to steep for 10 minutes, the stronger the better.
Line a rectangular cake pan with baking paper.  Set aside.
Place all other ingredients in the blender and blend until smooth and creamy, then add the tea brew when ready.  Blend again for about 30 seconds.
Pour mixture into your prepared pan and cover with plastic film. Place in the freezer and leave for about 3 hours or just set.  Take it out of the freezer and cut it into chunks which you put in your food processor and process until it starts to look like soft serve.  This is basically just to break up the ice crystals and give you a smoother texture.  Once you've done this.  Place it in the tin again and leave to set again, and you're done!

*I used Celestial Seasonings Bengal spice tea because it's caffeine free and tastes better than any other chai tea I've EVER had. It's also naturally sweet without having sugar in it and will add some more sweetness to your ice cream.  I'm telling you, it's the business!

Chocolate Ice Cream
Makes about 750 mls

Ingredients
2 cups of unsweetened vanilla almond milk
1/2 ripe avocado
4 TBS raw cacao powder
4 pitted medjool dates
2 TBS of coconut syrup
3 drops of dark chocolate stevia (optional, you can use plain stevia too)

Method
Line a rectangular cake tin with baking paper.  Set aside.
Place all ingredients in the blender and blend until super smooth and creamy.  Adjust sweetness if needed.
Pour mixture into prepared cake tin and cover with plastic film.  
Place in freezer and leave to set for about 3 hours.  Once set, break into big chunks and process in the food processor.  This will make it creamy and break up the ice crystals.  Place in cake tin again and leave to set overnight.  Serve on it's own or with:

Banana Peanut Butter Ice Cream
Serves 1

Ingredients
2 large ripe and frozen bananas
2 TBS of PB2 or 1 TBS of natural peanut butter
1/2 tsp of vanilla extract

Method
Process all ingredients in the food processor and watch the magic happen!  All the ingredients will turn into soft serve, ready for you to devour.
Hope you get to try out the recipes and that you enjoy them as much as I do.
Thanks to everyone for being so patient with me with these recipes, I know it's been long overdue!

Peas, love and mungbeans

xxb

Wednesday, 5 March 2014

rediscovery

Vanilla oatmeal with caramelised bananas, black tahini, goji and figs

For the month of February, I tried a different eating approach.  Still plant based of course, but it was one more focused on eating starches (grains, legumes, tubers), and it was based on the book by John McDougall, "The Starch Solution".
If you are interested in a plant based diet, I highly recommend you read the book, if anything, it will give you some information that you may not know.
I really liked the book and found it really informative, I also like it because it sticks to the low fat, high carb way of eating, which is what I enjoy the most.

Whilst it challenged some of my beliefs about eating, order of eating and food combining, I still gave it a go.
The first change that came about as a result of the book is that now I have renewed my obsession with oatmeal!
I remember always loving oatmeal, but since I started eating a predominantly raw diet, it kind of went out the window, along with most grains.
But now we've had a welcomed reunion and the love affair is well and truly established!
So, I will dedicate this post to some oatmeal recipes and give my views on the diet at the end.

Let's get oaty!

Basic Vanilla Oatmeal
Serves 1

Ingredients
1/2 cup organic wholegrain oats
1 1/2 cups of water
1 tsp organic vanilla extract
Stevia drops (optional)

Method
Place all ingredients in a small saucepan, except the vanilla, and stir on low to medium heat until the oats are cooked, approximately 3-5 minutes.
After they are cooked to your liking, stir in the vanilla extract.  

The secret to a creamy oatmeal, is making sure that you stir the whole time that you are cooking them.  This will always result in an oatmeal with a creamy consistency despite using just water.  Of course, feel free to use all milk or some milk, whatever ratio you love.  This is just the basic recipe.

Once you have your basic oatmeal recipe, you can make any flavour combination.  
Just think of all the amazing flavours you can create!!!


Fig, Cinnamon & Banana Baked Oatmeal
Serves 1

Ingredients
1/2 cup organic wholegrain oats (wheat free if you're avoiding gluten)
1 ripe banana (reserve a couple of slices for decoration)
1/2 cup of water
1/2 cup of non-dairy milk of choice
1/2 tsp ground cinnamon
1 medium fig, sliced

Method
Pre-heat oven 180 degrees celcius.
In a blender, add the oats, banana, water, milk of choice and cinnamon.  Pulse to mix through and break down the banana but don't liquify it, you still want there to be pieces of oats.
Pour it into a small baking dish, and top with fig & banana slices.
Place in pre-heated oven and bake for 15 minutes.  When the 15 minutes is up, place under the grill so that bananas and figs can caramelise.  Feel free to add a little of coconut sugar but I didn't bother.

Vanilla Pear Oatmeal with Spice Baked Apples
Serves 1

Ingredients
1x Basic Vanilla Oatmeal 
1 small ripe pear
1 medium apple, chopped
1 tsp pumpkin pie spice (or whichever ones you like)

Method
Pre-heat oven to 180 degrees celcius.  Add chopped apples to a bowl and pour over spices, mix well, making sure they cover every piece.
Place it on an oven tray lined with baking paper and place in the oven to roast for about 20-30 minutes.
I normally make the baked apples ahead of time, and keep them in a container in the fridge for when I want to use them.
I bake them at the same time I bake pumpkin, saves resources and time!
Once they are done, go on to make the basic vanilla oatmeal recipe, adding finely diced pear at the beginning of the cooking process so that the pears can get soft and breakdown.  Start mashing the pears whilst you stir the oatmeal.  This with the vanilla will combine to make the most delicious flavour combo, I promise!
Once ready, pour into a bowl and top with your spiced apples.  I also added some raw pepitas.


Blueberry Vanilla Oats with Mixed Berry Compote 
Serves 1

Ingredients
1x Basic Vanilla oatmeal
1/2 cup of blueberries
1/2 cup mixed berries*
1/4 cup of water
stevia drops (optional)

Method
Make the basic vanilla oats recipe, adding the blueberries to the pan at the beginning.  This will soften the blueberries and turn the oats the most lovely colour!
For the compote, add the mixed berries, water and stevia (if using) to a small saucepan and heat on low-medium heat until the berries start to breakdown and the water begins to evaporate.
Once the oatmeal is done, place into a bowl and top with the berry compote.
I served mine with some cinnamon spiced raw tahini which I just made by mixing some ground cinnamon with a tablespoon of tahini & a bit of water to make it runnier.  You could also use peanut butter if you prefer.

*Feel free to use frozen berries, they are handy & I always have them in the freezer for when berries are out of season.  They are a much cheaper option too.

Now, for my thoughts on the eating approach proposed by Dr. McDougall:

I had no expectations as I feel that the way I eat is pretty healthy.  The only thing I thought might happen is that I would get bloated from eating all the grains, but this didn't really happen.

The main challenge of this diet for me was actually giving myself a break!  A break from feeling bad about deviating from what I normally eat, a break from not necessarily eating huge amounts, a break from being consumed with what I'm going to eat!
I know that may sound silly, but I felt that things had started to get a little bit ridiculous.
I mean, the reason why I started eating plant based was so that I could gain the well documented health benefits, but then I turned into a person consumed by my quest of 'health'.  Not that there is anything wrong with that, it's just that for me, I felt that I was letting it take over you know?
But it's all good now.  In regards to how I feel when I eat a combination of raw and cooked, grains or not:  HAPPY!
It's nice to have the flexibility, and rather than be dictated by a 'philosophy', I'm now dictated by my gut! 

Hope that helps, and please post any oatmeal recipes that you love so that I can try them out.

Peas, love and mungbeans

xxb